Banner 9 Register for Classes
How to use the "Register for Classes" link located in your myYC portal
NOTE: The portal navigation has now changed. Select "Classic Registration". See Signing In instructions below. This registration tool does not work well on tablets or mobile phones.
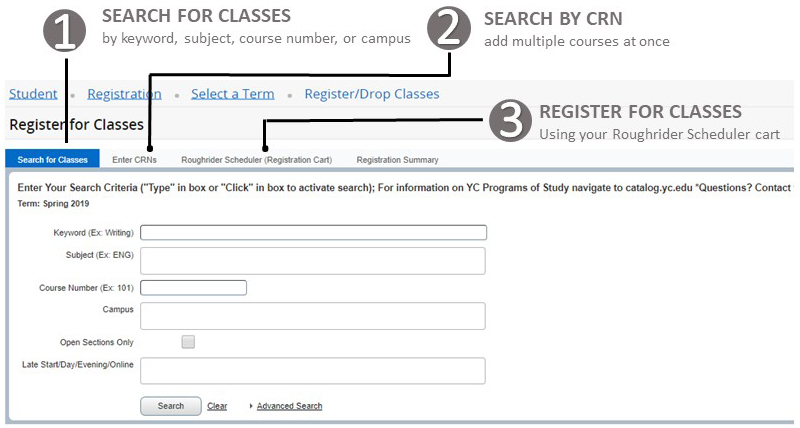
- Search by class, keywords or other attributes, register by CRN or with your Scheduler registration cart
- Class information includes an easy-to-read, days of the week view and links to course and instructor information
- Add classes from your Roughrider Scheduler with one click under the Registration Cart tab
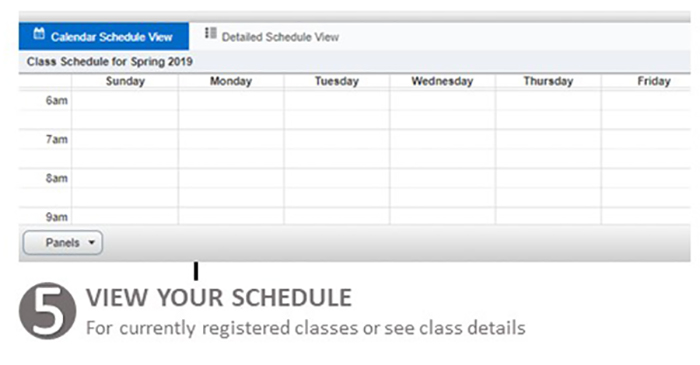
- Calendar and detailed schedule views display below the registration window
- Add your schedule right to your calendar or print
- For mobile-friendly registration, please use the "Register for Classes" or "Roughrider Scheduler" registration options.
(Google Chrome preferred; Internet Explorer not recommended)
- Sign into your MyYC portal
- Click on the "Classic Registration" quicklink at the top of the page

- NOTE: For degree-seeking students or if you are registering for more than one or two classes, use the Roughrider Scheduler to help add in breaks and build a class schedule that works for you. Send your selected schedule from the Scheduler to complete your registration
- You will be redirected to the registration home page. Click on "Register/Drop classes"

- Choose a term/semester

Your search and registration information will be presented in three panes to you:
Center pane: Displays class search options and classes available to add based on your search
Lower left pane: Shows calendar view or detailed view of your schedule (Class Schedule window)
Lower right pane: See registration status. ADD/DROP classes (Enrollment Activity window)
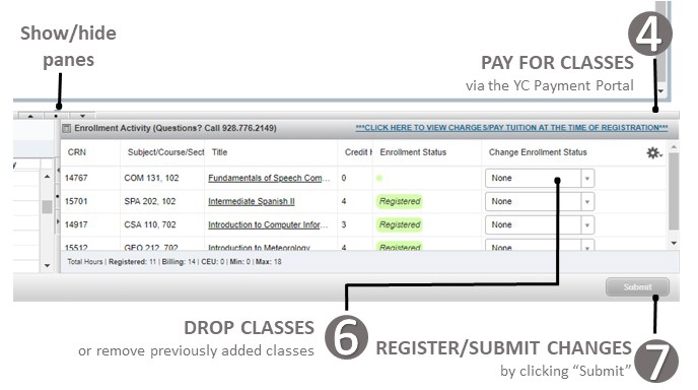

- In the Enrollment Activity window (lower right), find the class you wish to drop
- Using the pull-down menu, select "Withdraw initiated by student"
- Click "Submit" button to make the change to your schedule
Note: withdraw requests are subject to registration guidelines. Please see the Academic Calendar for details

- Basic searching can be done by using the subject (e.g. English) or keywords (e.g. Zumba)
- Campus search helps you limit to a particular campus. Leave blank for all campuses
- By CRN: Click on the "Enter CRN" tab at the top to enter the multiple CRN's all at once
- Registration Cart (Roughrider Scheduler)

Use the Roughrider Scheduler quicklink in your portal to automatically generate schedules based on your class needs as well as your breaks/blocked out times for other obligations. Click on the "Roughrider Scheduler (Registration Cart)" to see any schedules you built in the Roughrider Scheduler that you sent via Registration Cart to the registration window. Classes can be added from that tab to your Enrollment Activity window - Advanced Search function helps you to search for specific information such as: degree requirement categories, late start classes, online classes, particular days of week, particular instructors, etc.
Read available classes information

- Meeting days show in blue with the meeting times next to it. Online courses will have no days highlighted.
- Meeting Types - Some courses have both online and in-person meeting types or other meeting types. See more on Understanding Meeting Types
- Course titles are hyperlinked. Click on hyperlinks to learn about pre-requisites, coures outcomes, etc.
- Blue triangles next to the course count indicate that this class meets at the same time and location with another class (i.e. crosslisted classes).

Click on the course title and look at the Cross Listed courses tab to see the total number of seats available between all of the crosslisted classes. 
Note: Use the " Search Again" button if you do not see a class that fits your schedule or you have too many choices
- Sorting -- Most columns can be sorted using the arrows next to the table headers
- Need more info? click and drag on the lines between the headers to widen column width
- See all class choices -- check the bottom of the search window to see if there is more than one page of listing


- In the Search window, find the class you wish to add
- Select "Add" next to the course you would like to add to your schedule.
- Your requested class will display in the Enrollment Activity window as "pending" (lower right)
NOTE: you will need to click the "Submit" button to register for the course

- Click on the "View Charges/Pay Tuition" link above the Enrollment Activity window (lower right)
- Payment Pop-up Window will display the amount owed
- Click on the "PAY TUITION"
 link at the top of the window to proceed to the Payment Center
Viewing/downloading your schedule

- Click on the "Registration Summary" tab above the search window (lower right)
- Email and Calendar option - Click the Calendar/Envelope in the upper right corner to email your schedule to yourself. You can also send yourself a calendar link to add your courses to your calendar.
- Print by clicking on the printer icon in the upper right hand corner
- More info -- show/hide schedule information by changing what is viewable in the settings cog icon on the right-hand side
Waitlist for a class if the class is full
Full classes will show an alert in the Status column. If a waitlist is available for that class, it will show how many seats are available for waitlist.
-
Click on the "add" button. This will add the class to your Enrollment Activity window and list it as pending.
- Using the Action drop-down menu, change the Enrollment Status to "Waitlist".
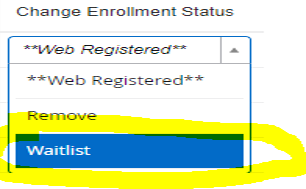
- Click "Submit".
-
If you submit classes from your Enrollment Activity window without changing the status to waitlist, you will receive a Registration Add Error stating “Class is full. Waitlist available”. You may select Waitlist from the drop down menu under Action and then click submit to waitlist the course on your schedule.
See the Waitlist information page for more info and F.A.Q.'s on how waitlisting works.